- Physics Lab Equipment
- Chemistry Lab Equipment
- Biology Lab Equipment
- Anatomical Lab Equipment
- Learning
- Educational Lab Equipment
- Magnets
- Agriculture
- Astronomy
- Earth Science
- Geography Lab Equipment
- Safety Lab Coat
- Laboratory
- Meteorological
- Electricity & Magnetism
- Heat
- School Lab Equipment
- Lab Glassware
- Science Lab Equipment
- Tvet Lab Equipment
- Robotics Kits Supplier and Manufacturer for Schools India
- Math Lab Equipment Manufacturers and Exporters in Ambala
- STEM Kits Manufacturers and Supplier India
- Engineering Lab Equipment
- Hospital Lab Equipment
- Water, Sanitation & Hygiene Supplies
- Cold Chain, Solar & Communication Equipment
- Nutrition
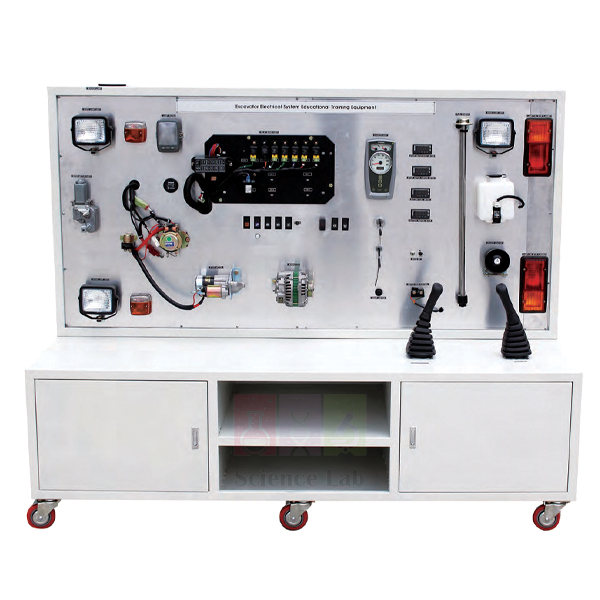
Excavator Electric Circuit Training Simulator
The Excavator Electric Circuit Training Simulator lays out the electronic systems of a Hyundai heavy machinery excavator 555-7K on an open frame, so trainees see where each part sits and how it behaves. They work the operating and hydraulic levers, lights and horn, watch the instrument panel respond and measure the input and output of every component.
Excavator circuit simulator specifications
| Parameter | Detail |
|---|---|
| Basis | Electronic systems of a Hyundai heavy machinery excavator 555-7K |
| Composition | Battery, operating lever, light system, horn, hydraulic lever, instrument panel, starter motor, battery connector, relay, digital meters and other parts |
| Layout | Components normally hidden on an actual machine opened out to show their operating state and location |
| Purpose | Understanding excavator electrical components; troubleshooting and inspection theory and training |
| Training content | Measuring the input/output data in each component |
| Size | Approx. 2,000 × 600 × 1,700 mm |
| Product code | SLE/ATE/21 |
| Minimum order | 10 units |
| Dispatch | Usually within 7 to 10 working days |
| Manufacturer | ScienceLab (Jain Scientific Equipments Pvt Ltd), Ambala, India |
Fault-tracing exercises on the excavator circuit
Starting circuit walk-through. With the battery connector made, trainees operate the starter circuit and note the voltage at the battery, the relay and the starter motor. A digital multimeter in each pair's hands lets everyone take the readings, which are then repeated while the starter turns.
Lights, horn and instrument panel. Operate the light system and horn, then move the operating lever and hydraulic lever and watch the instrument panel respond. Students mark the input and output of each component on a copy of the layout and keep it as the healthy-circuit record.
Logical fault finding. With normal values on record, the instructor isolates the battery, alters one connection and reconnects it. Trainees work through the battery and connector first, then the relays, starter motor and switches, and explain each reading that led them to the fault.
Operator and technician side by side. Run this panel in the same course as the excavator VR simulator, so learners see how the controls they drive with depend on the electrical system. The wheel loaders electric circuit training simulator then extends the same tests to a second earth-moving machine.
Frequently Asked Questions About the Excavator Electric Circuit Training Simulator
Why might an excavator not crank when the start switch is turned?
Work from the power source outwards. Check battery voltage and the battery connector, then the main fuse or fusible link, the start switch output, the starter relay and finally the starter motor. On a real machine, also check the safety lever, because on many excavators the interlock blocks cranking unless it is locked.
What is a fusible link, and can it be replaced with ordinary wire?
It is a short section of special wire, a few sizes thinner than the cable it protects, with insulation made to survive when the core melts. It sits near the battery and opens the main feed during a heavy short. Replace it only with a link of the correct rating, never with plain wire.
How does a voltage drop test find a bad cable or connection?
Measure across the cable or joint while current is flowing, for example while the starter turns. A sound cable shows only a small reading. A large reading means high resistance from corrosion, a loose terminal or a loose starter bolt. A resistance test with no current flowing can miss this kind of fault.
Why should paired machine batteries be replaced together?
Many excavators run on two batteries in series. If a new battery is paired with an old one, they charge unevenly, so one is overcharged while the other runs flat, and both fail early. Fit matching batteries of the correct type at the same time and make sure every terminal is clean and tight.
How is an open circuit found with a voltmeter?
Switch the circuit on, put the black lead on a good earth and move the red lead along the feed from the battery towards the load. Where the voltage disappears, the break lies between that point and the last good reading. The horn and light circuits on the simulator are good first exercises for this method.
Do excavator electrics need the machine maker's diagnostic software?
For the electronic control modules on modern machines, yes: they store fault codes that are read with dedicated software. Starting, lighting, horn and relay circuits are still tested with a meter and a wiring diagram, which is what this simulator trains.
Heavy machinery trainers and meters for circuit tests
- Excavator VR Simulator
- Wheel Loaders Electric Circuit Training Simulator
- Electric Forklift Electric Circuit Training Simulator
- Digital Multimeter
- Advanced Digital Multimeter
To request a quotation, send the product name, code and quantity through our contact page or add the item to your enquiry cart.
Last updated: 20 November 2026