- Physics Lab Equipment
- Chemistry Lab Equipment
- Biology Lab Equipment
- Anatomical Lab Equipment
- Learning
- Educational Lab Equipment
- Magnets
- Agriculture
- Astronomy
- Earth Science
- Geography Lab Equipment
- Safety Lab Coat
- Laboratory
- Meteorological
- Electricity & Magnetism
- Heat
- School Lab Equipment
- Lab Glassware
- Science Lab Equipment
- Tvet Lab Equipment
- Robotics Kits Supplier and Manufacturer for Schools India
- Math Lab Equipment Manufacturers and Exporters in Ambala
- STEM Kits Manufacturers and Supplier India
- Engineering Lab Equipment
- Hospital Lab Equipment
- Water, Sanitation & Hygiene Supplies
- Cold Chain, Solar & Communication Equipment
- Nutrition
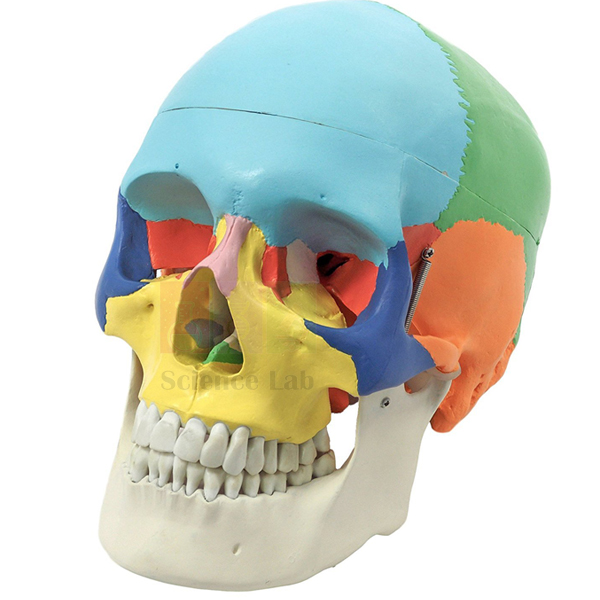
Human Skull Model, Life Size Colored
A life-size skull with each bone painted in its own colour, so students can see where one cranial or facial bone ends and the next begins. It comes apart into 3 parts: a class studies the outer bone boundaries first and then opens the skull to look at its inner surface. Biology and anatomy teachers use it to introduce bone identification.
Colour-coded skull model details
| Parameter | Detail |
|---|---|
| Size | Life-size |
| Colour coding | Bones painted in different colours |
| Parts | Disassembles into 3 parts |
| Purpose | Study and identification of the individual skull bones |
| Product code | SLE/BL/82 |
| Minimum order | 10 units |
| Dispatch | Usually within 7 to 10 working days |
| Manufacturer | ScienceLab (Jain Scientific Equipments Pvt Ltd), Ambala, India |
Skull lessons with the colour-coded model
Cranial bones and sutures. Students name the frontal, parietal, temporal and occipital bones by colour, then trace the coronal, sagittal and lambdoid sutures where two colours meet. The same task is repeated on a plain plastic skull, where only the suture lines show the boundaries.
Facial bones, left and right. With the face towards the class, students point out the maxillae, zygomatic and nasal bones and the mandible, and say whether each bone is single or paired. The hidden ethmoid is easier to grasp with a loose ethmoid bone in hand or on a skull bones model that comes apart into many sections.
Skull and brain. Open the model into its 3 parts and show the inner surface that encloses the brain. Then place a brain model in head beside it so students connect each skull region with the brain lobe it covers.
Paper-tag quiz. Set numbered paper tags beside chosen bones, not stuck onto the paint, and ask students to write the bone names on an answer sheet. A partner checks the answers, and all tags are removed before the next group arrives.
Frequently Asked Questions About the Human Skull Model, Life Size Colored
Which bones should students learn first on a colour-coded skull?
Start with the large cranial bones: frontal, the two parietals, the two temporals and the occipital. Add the sphenoid and ethmoid next, then the facial bones such as the maxillae, zygomatics, nasal bones and the mandible. The colours keep each bone separate while the names are still new.
How do the colours help with learning the sutures?
Each suture runs along a line where two colours meet. The coronal suture lies between the frontal and parietal bones. The sagittal suture runs along the midline between the left and right parietals, which are painted in different colours. The lambdoid suture lies between the parietals and the occipital. Once these lines are familiar, students can find them on an unpainted skull.
Should a class use a coloured skull or a plain one?
Use both, in that order. The coloured skull makes first identification quick and reduces confusion between neighbouring bones. A plain skull then tests whether students can find the same bones by sutures and shape alone, which is what practical exams usually expect.
Can labels or tape be stuck on the painted bones?
Avoid adhesive tape and stickers on the painted surface, because peeling them off can lift the colour that marks each bone. Use loose paper tags or a pointer instead, and clear every label away at the end of the session.
What can students see when the skull is taken apart?
Separating the 3 parts opens the skull, so the inner surface of the cranium can be studied as well as the outside. Use this view to explain the cavity that holds the brain, then refit all the parts before the model is stored.
Skull models and a storage case for bone identification lessons
- Human Skull Model, Plastic
- Human Skull Bones Model
- Human Skull with Facial Muscles
- Human Skull Model, Fetal Child
- Human Skull Storage Case, Black Plastic
To request a quotation, send the product name, code and quantity through our contact page or add the item to your enquiry cart.
Last updated: 14 November 2026